
Defining Anodizing
Anodzing is an electrochemical process by which an oxide layer is grown on the
surface of a substrate, in this case aluminum.
This is accomplished by placing the work piece in an electrolytic solution
and passing current through it to a second piece called an electrode. In this case, the work piece forms the anode
of the cell, a lead plate forms the cathode and the electrolytic solution is a
mixture of sulfuric acid and water.
Why To Anodize Aluminum
The
advantages of anodizing are two-fold.
The first advantage is the stunning color that may be imparted to the
piece. The second (and debatably more
useful) advantage is the dramatic increase in hardness of the surface. The surface effectively becomes sapphire (Al2O3)
when anodized. 6061 is a common alloy of
aluminum because it is the least expensive to purchase and fairly easy to
machine. Alloy 6061 also happens to be
the easiest to anodize. The hardness of
this alloy is less than 25 on the Rockwell C scale. Anodized aluminum has hardness close to
80. For comparison, diamond tops the
scale with a hardness of approximately 100.
What Is Required To Anodize
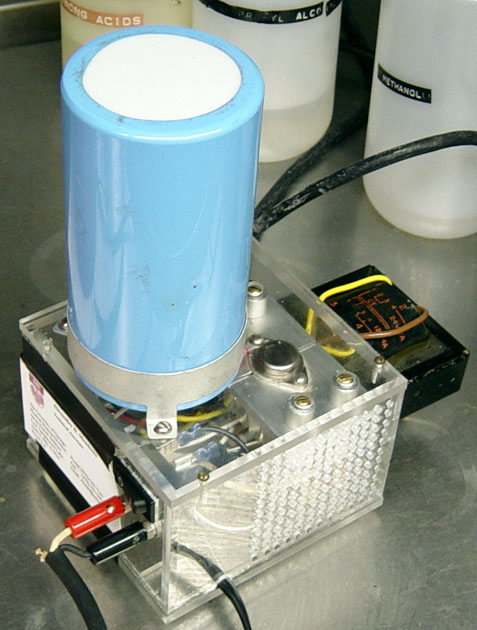
A Power Supply
Anodizing
requires some special equipment. The
first piece of equipment is the power supply.
Anodizing can be done with many different kinds of power supplies;
however, if you want to predict the timing for your anodizer, your options are
fewer. In such a case it is necessary to
have either a “constant-voltage” or a “constant-current” supply. Many people use automotive battery chargers
to anodize; these are examples of “constant-voltage” supplies. A “constant-current” supply allows the
voltage across the cell to vary while maintaining the current through the cell
at some value. Below is a schematic of
my power supply, which is of the “constant-current” variety.
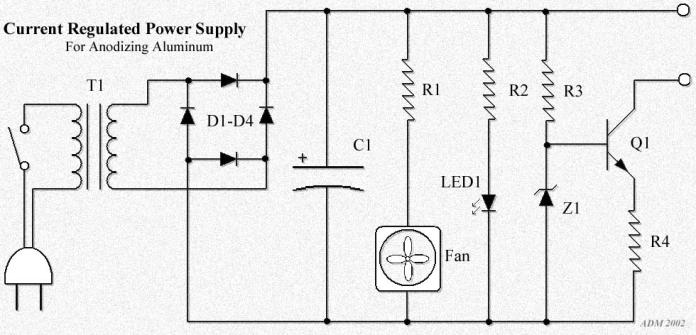
Components
T1 24V, 2A Transformer
D1-D4 1N5401 3A 50V Diode or equivalent
C1 40,000 mF 40V electrolytic Capacitor
R1 Depends on Fan (limits
current)
R2 1.7k – 2k Resistor (limit
current in LED)
R3 ~450W 2W Resistor
R4 2W 20W Power Resistor (or two 1W 10W in series)
LED1 Garden-variety red LED
Z1 1N5229 4.3V Zener Diode
(note reverse bias)
Q1 3A NPN Power Transistor (like
a 2SD2185)
FAN 12-Volt
The
above values are mostly calculated in retrospect; some of the components I used
were grab-bag items or just what I had lying around. Consequently, I had to tweak the value of
some of the resistors (namely the value of R3 depending on Q1). Also, C1 doesn’t need to be 40,000 mf, 5000-10,000 mf would be more than
adequate as long as it is rated for 40V.
I just happened across this one and what self-respecting technophile
could resist using it?
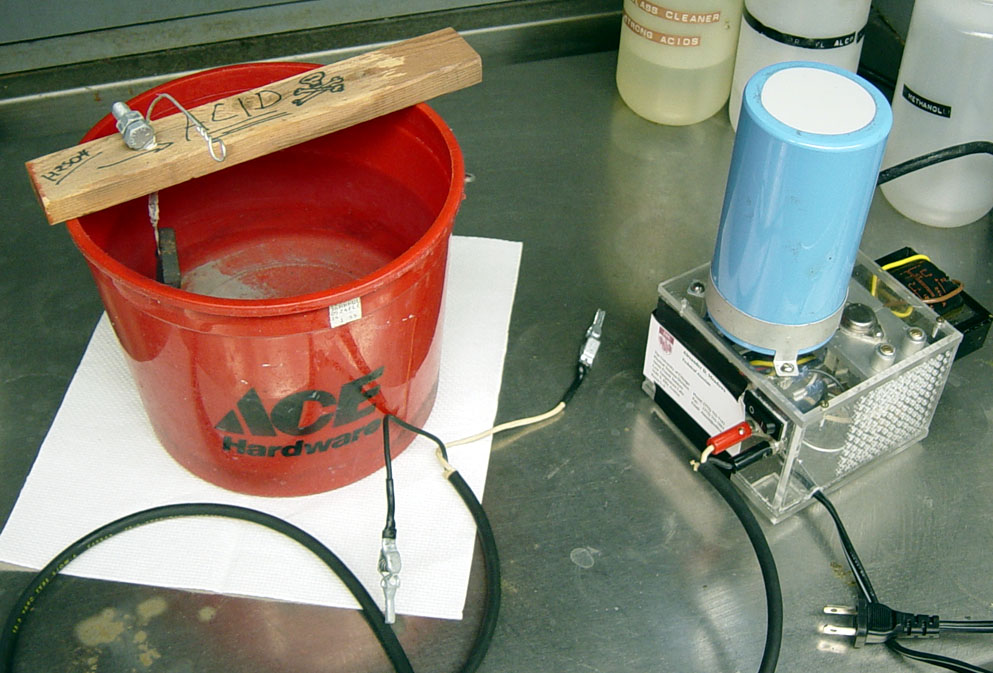
An Electrolyte Bath
The next item necessary is the
electrolyte bath. It sounds very
technical, but it is actually only a mixture of sulfuric acid and water. That’s only half the story, however. You also will require a container to hold the
solution and the parts. Just about any
plastic or glass will do. I scrounged a
plastic bucket. (ACE should pay me for
advertising) The ratio of acid to water
is what is important. About 1 part acid
(96% concentrated by volume from a chemical supply store) is required for 6
parts of water. This ratio may be adjusted
based on the concentration of the acid. Warning: Always add acid slowly into water; Never
quickly AND NEVER pour water into acid! The temperature of
the water will rise significantly when you add the acid to it due to the
exothermic solvation occurring. The temperature of my solution increased by 40º C. Allow the solution to cool to room
temperature before using it.
It’s nice to have something
from which to hang your electrodes. I found
a piece of wood with two holes through it to be a simple and effective
solution. One electrode of your cell
will be the part to be anodized; the other will be a lead plate.
How To Prepare The Piece
If
you want the piece to be smooth after it is anodized, it must be smooth before
it is anodized. Polish your piece first
with fine sandpaper and then buff it to a mirror finish if desired. Anodizing will not hide any faults in your
piece. After polishing is completed,
clean the piece well using a non-abrasive precision cleaner (if possible) or
detergent. Rinse thoroughly, handling
the part only with latex gloves or tissues or something similar after cleaning.
The
next difficult preparation is to attach your aluminum electrode
wire. There are many ways to attach to
your piece; the method you use will often have to be incorporated into your
design. The point of attachment will not
get anodized for a small radius around the wire. On some projects this hardly matters, for
others, you’ll want to hide the point of contact. My method of connection thus far has been a
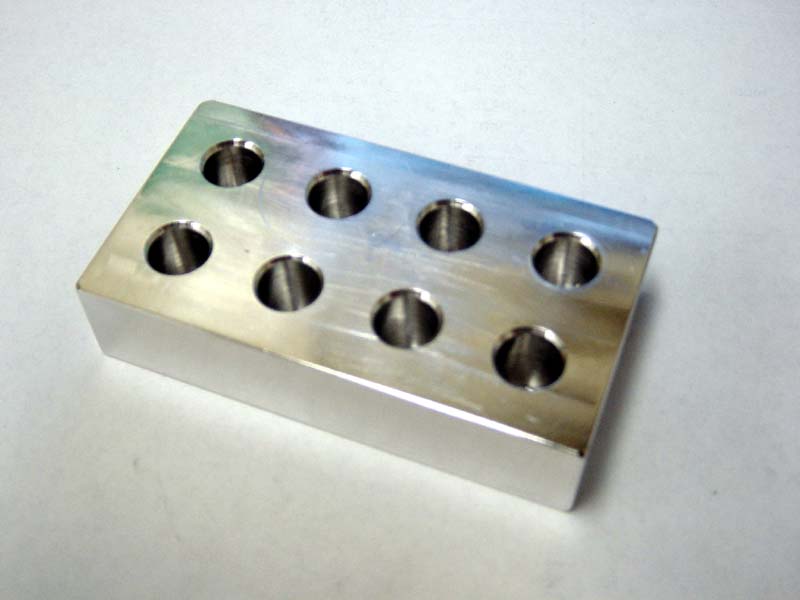
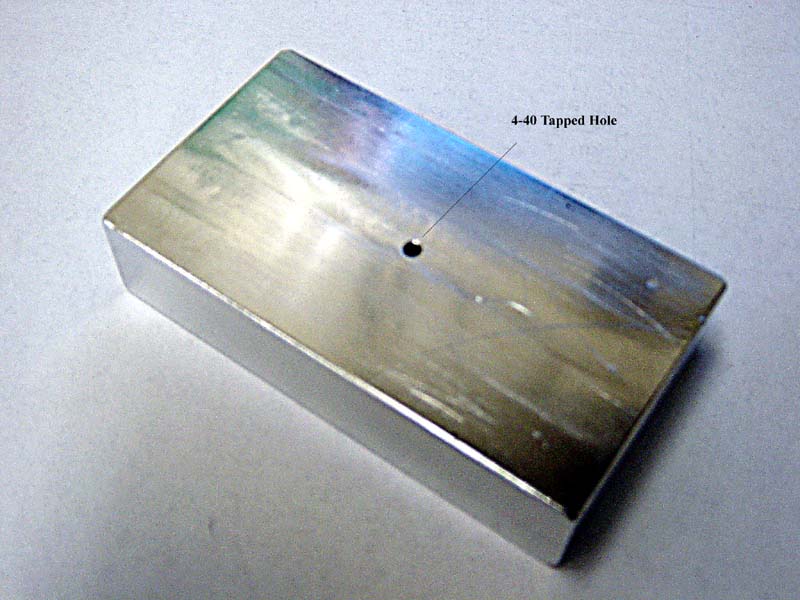
4-40 tapped screw hole. 16-gauge (AWG) aluminum
wire folded over at the end and crimped can easily be force-threaded into such
a hole. If your project has such a hole,
then the screw head will likely cover the un-anodized point. Otherwise, consider putting such a small hole (0.089”) on the bottom of the piece.
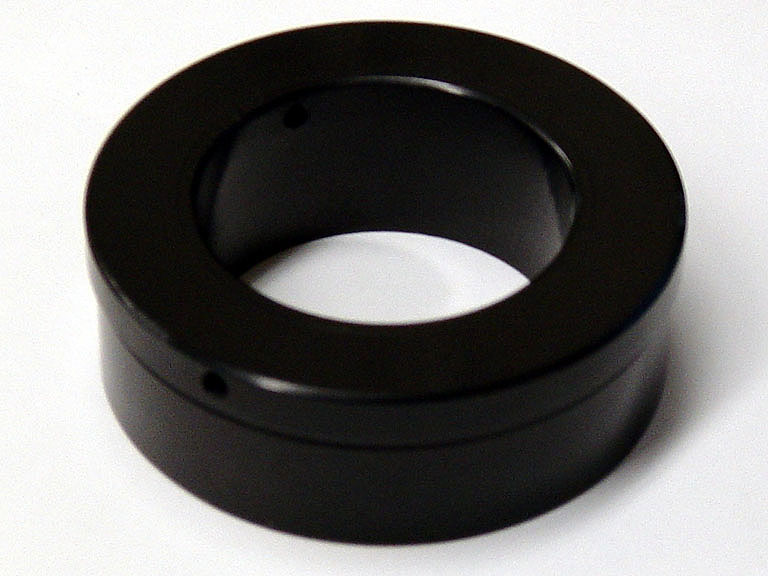
On To Anodizing
Surface Area
Now
you need to know the surface area of the piece, at least to a close
approximation. It is not necessary to use precise measurements or to account
for every detail of the shape. In the
example to follow, I will estimate the diameters and ignore the ridge around
the top of the piece. All my pieces have
been small, thus far and I measure their surface areas in square inches
(sqin). Below are four useful formulas
for finding surface areas:
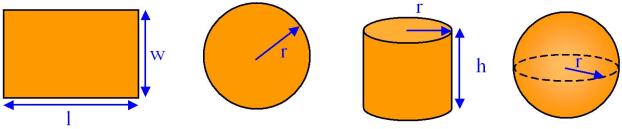
|
Area of a rectangle of
length l and width w: |
Arect = lw |
|
Area of a circle of radius
r: |
Acirc = pr2 |
|
Area of the outside
of cylinder of radius r and height h: |
Acyld = 2prh |
|
Area of a sphere of radius
r: |
Asphe = 4/3pr2 |
p=3.1415926…
Using
these formulas, one can approximate the area of almost any surface as a sum of
many simpler surfaces. Now, we can calculate
the area of this eyepiece adaptor. It is
essentially a cylinder with a smaller cylinder inside it; the top and bottom we
approximate as the difference of two circles.
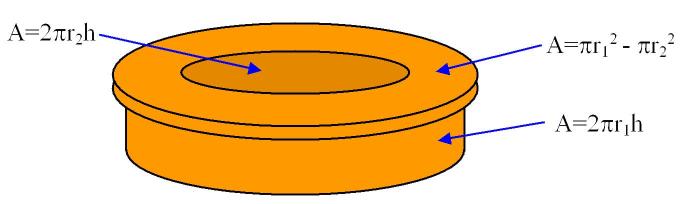
The
outside diameter is 2 inches, the inside diameter is 1.25 inches and the height
is 0.68 inches. The surface area of the
outside of the big cylinder is Asurface
= 2 p (1) (0.68) = 1.36 p. Saving the p’s until the end makes the
math easier. The surface area of the
small cylinder is Asurface = 2 p (0.625) (0.68) = 0.85 p. Finally, the surface area of the top and
bottom is the area of the large circle minus the area of the small circle, Asurface = (1)2 p – (0.625)2 p = 1 p – 0.391 p = 0.609 p. That makes our total surface area the sum of
these values: Atotal
= 1.36p + 0.85p + 2 (0.609p) = 3.428 p = 10.769 square inches.
Anodizing Time
The
amount of time in the anodizing cell depends on the surface area of the
piece. The time-honored rule for this is
900 amps per square foot per minute.
This sounds as if an enormous power supply is required, but that is not
the case. Once you know the surface area
in square inches, divide by 144 (the number of square inches in a square foot);
this will give you the surface area in square feet. For our example, this gives us 0.075 square
feet.
Next
you multiply this by 900 to get the number of amp-minutes to anodize. For our example, we get 67.5 minutes or one
hour, seven minutes and 30 seconds. This
is the time required using an estimated area.
To compare, after calculating the surface area using exact measurements
and accounting for all surface features, I computed 68.23 amp-minutes of
anodizing time. There is virtually no
difference between these numbers, for our purposes, thus an approximated
surface area will suffice for these calculations.
The
number of amp-minutes corresponds to the time required to anodize with a steady
supply current of 1 amp. A supply of 2
amps will work twice as fast, etc.
Consequently, we now divide our amp-minutes by the current supplied by
our power supply. In the case of my
supply, this value is 1.95 amps. This
value can be measured as the short-circuit current with an ammeter of
sufficient robustness and a current-limited supply. An ammeter in series with
the work cell can preferentially measure it.
With my power supply, the time required is 34.62 minutes. Since it doesn’t hurt anything to run the
time long, and you don’t want to remove the piece from solution before it is
finished, I like to increase the time by 20 percent. This leaves us with 41.53 minutes @ 1.95 amps
of current. Thus, the formula for time
for a given supply for any piece is:
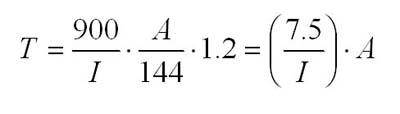
T = time in minutes, I =
supply current in Amps, A= surface area in sqin.
By plugging
in the supply current, you can get a unique “anodizing coefficient” for your
supply. For my supply, this would be
3.85 min/sqin.
Once this is known, the anodizing time can be computed by multiplying
the surface area in inches by this coefficient.
To check this, our computed time of 41.53 minutes should be
approximately equal to 3.85 x 10.769, which equals 41.42. Close enough!
The Wet Process
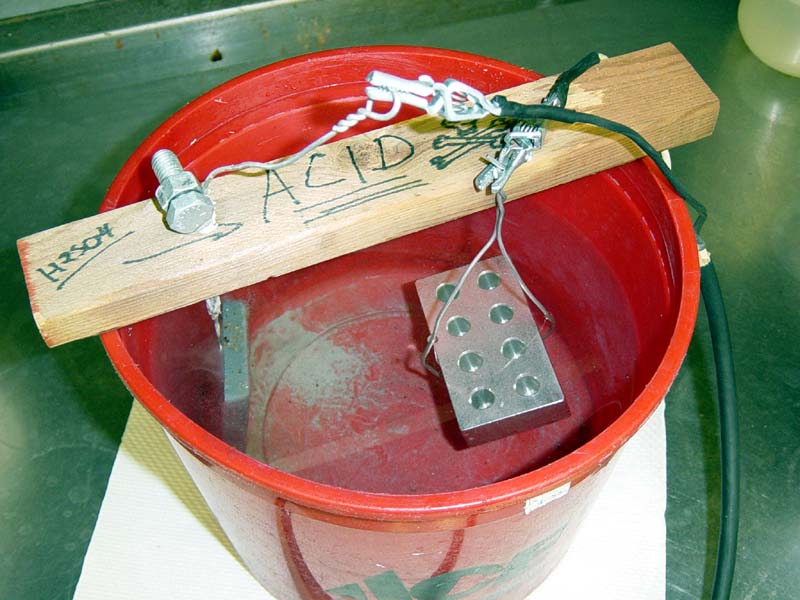
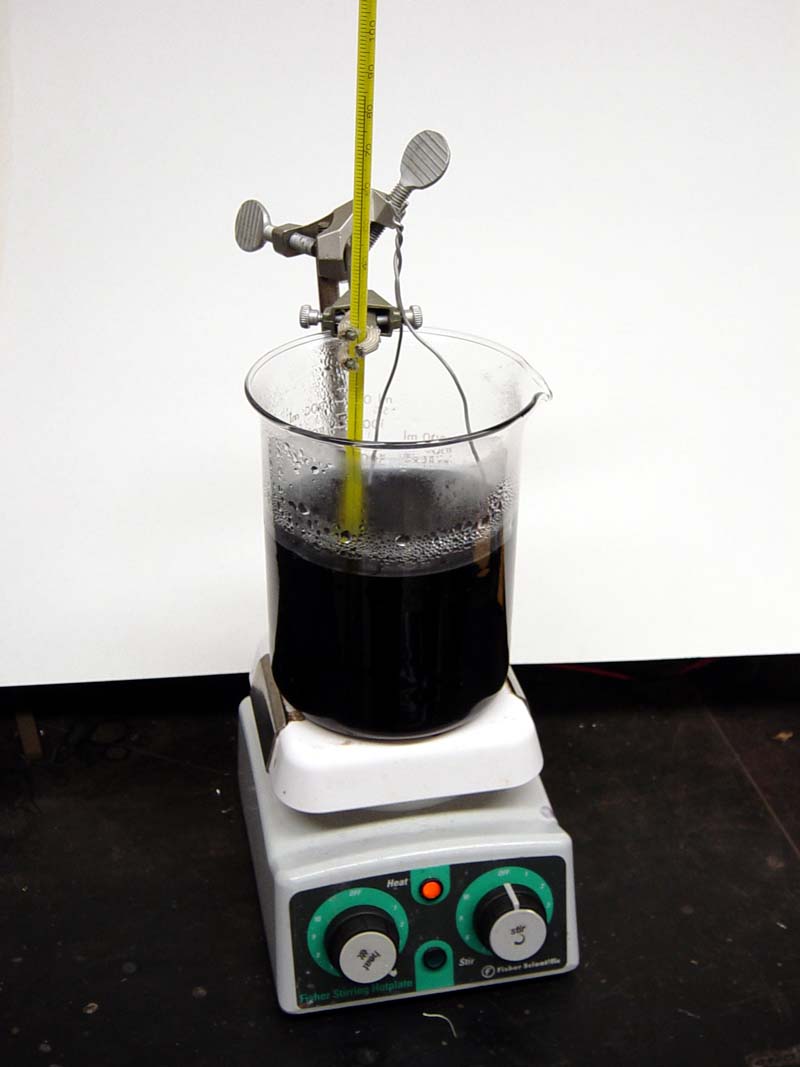
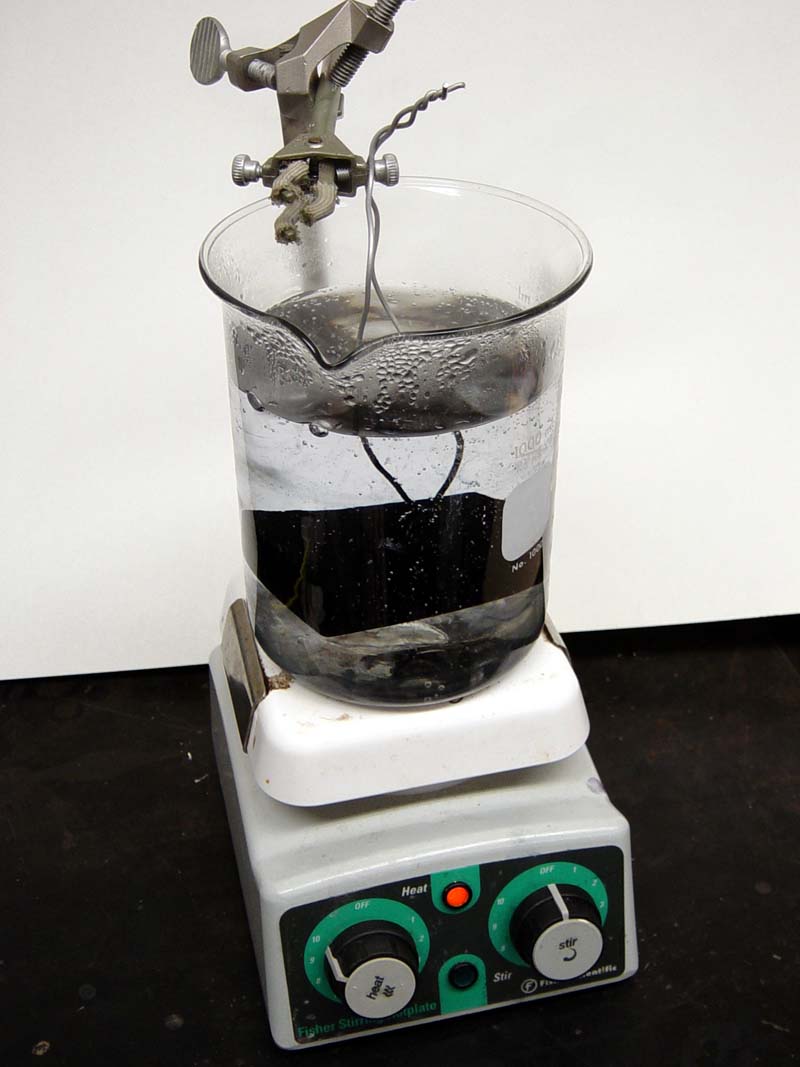
Now,
set up your electrolyte bath in a well-ventilated location. Either a fumigation hood or outside would
work best. As the anodizing occurs, the
cell will produce noxious (and possible corrosive) fumes. Next, hang the lead negative (-) electrode (cathode) at one end of the electrolyte bath and
hang your work piece, the positive (+) electrode (anode), at the other
end. Ensure your work piece is
completely submerged and not touching the sides or bottom of the tank. It is also a good idea to tilt your piece so
that no bottom surface will trap bubbles thus forming a pocket of gas next to
your piece. If such a pocket is formed,
no anodizing will occur under it. Now,
attach the positive lead of the supply to the work piece electrode (anode) and
attach the negative lead of the supply to the lead plate electrode (cathode). Turn on the supply and begin timing the
anodizing. Observe the bath, there should be bubbles coming to the surface from
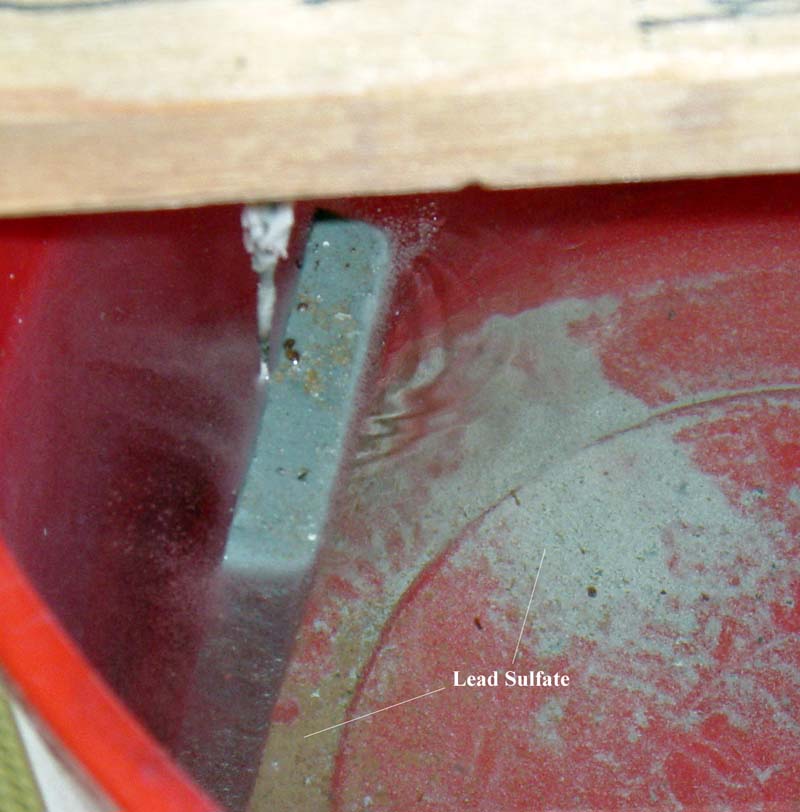
both electrodes, though there may be more forming at one or the other. Check back in a few minutes and make sure no
lead sulfate is forming. Lead sulfate
will appear as a brown dust forming on the lead plate and drifting to the
bottom of the tank. If this occurs, it
indicates that your power supply leads are backwards, switch them and reset
your anodizing time.
Once
the time is up, look at the piece in the solution. It should appear slightly more yellow in
color, and perhaps a little shinier. If
your time was accurate and your power supply was reliable the piece is certain
to be anodized. Remove it from the bath
and rinse it with cold water to remove the acid. Do not use any cleaning solutions on it. Once it is clean, dry it with a lint free
cloth or paper towel or Chemwipe or whatever. After some time passes, you will notice a
powder-like layer of yellow oxide forming on the surface. This is in addition
to the oxide layer formed by anodizing.
This is just a reaction to the oxygen in the air and is not
harmful. It is not necessary to remove
this oxide before continuing, as it will return in a few minutes. After dyeing and sealing, this extra oxide
may be removed with a buffing wheel or similar polishing device. (It may be possible to prevent or inhibit
this oxide formation by leaving the rinsed piece submerged in water until the
dye bath is ready)
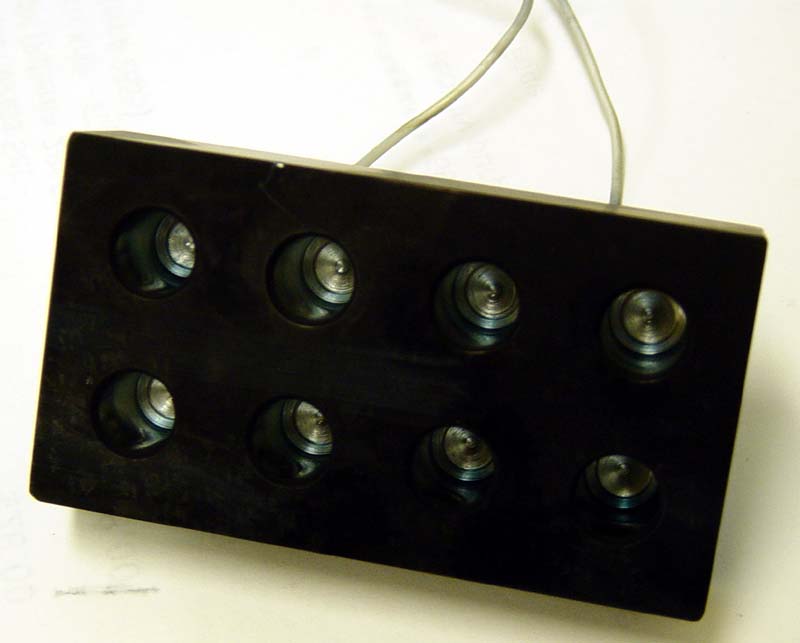
Dyeing And Sealing
Next, it is time to dye the piece. The dye I use is from http://www.caswellplating.com and is specifically formulated for dying anodized aluminum. You can find the dye listed in the “plating kits” section. $9.00 will get you any color you want (from their list) except black, which will cost you $27.00. The procedure is the same for all their colors. Mix the dye with the prescribed quantity of water. (For the Caswell dye, one bottle mixes with 2 gallons of water) Use distilled water from the grocery store to prevent water spotting. Heat enough of the dye to cover the piece in a container to 140º F (60º C). Hang your piece in the solution for 15 to 20 minutes. After this time, take the piece out, but don’t bother rinsing it. Return the dye to its storage bottle (probably what the water came in); it can be reused almost indefinitely. Fill your container with enough distilled water to cover the piece. Bring the water to a boil. You can now seal your part by boiling it for 15 to 20 minutes or by hanging it in the steam for 30 to 40 minutes. Hanging in the steam will prevent water spotting if you are not using distilled water.
Finishing
To finish your piece, you can buff and polish to a mirror finish or leave it matte. You may also paint the surface. Most paints, which will not adhere to aluminum, will successfully adhere to the anodized surface. The anodized surface is very hard, but also very thin, it may be scratched by sharp corners or instruments. Cleaning may be effected with mild detergents; caustics such as lye will remove the anodized layer.